Christmas knits proceed apace. This skinny scarf with the equally skinny fringe is for a young friend of the family who -- far as I know -- doesn't read this blog, so it's safe to post the photo! Here it is, lounging atop my easy chair in front of my sunny front window. It's made of Noro Kureyon in a box stitch pattern (knit two, purl two, alternating)...very soothing and simple to knit. It's a good three metres long, including fringe, so...lots of 'round the neck potential. Hope she likes it!
The other Christmas knitting and sewing are moving right along too...sorry, no photos. Nope; not a one. :-)
 Pookie's help in the sewing studio hasn't hampered my work on my "Easy Street" mystery quilt at all. At right is the tray of 193 four-patches from Clue #1 -- 192 called for, and one for the pot. Clue #2 of the mystery was posted yesterday, and is now underway.
 Clue #2 requires assembling 128 -- count 'em! -- Flying Geese Units (FGUs). Ms. Bonnie loves the rulers she uses to make these, and waxes eloquent about them in a very helpful tutorial. complete with video. I believe she used at least one of these rulers last year for Orca Bay, too. However, I'm still not on board with 'em. I have enough rulers. However, she did make one valid point: while there are many methods for successfully constructing FGUs, some waste quite a bit of fabric. Considering my favourite method to date -- a rectangle and two squares -- I had to admit my method was one of those.
Thus I decided to check out other options, and I came across this one from Pieceful Quilter. It involves a large square and four small squares, from which one gets four FGUs at one time. First I made a sample, and once I figured out her method, I forged ahead.
For Clue #2, the FGUs had to measure -- unfinished -- 2' x 3 1/2". According to Ms. Pieceful, for every 4 units of that size, I would need one 4 1/4" square and four 2 3/8" squares, which you see here in purple (32 of 'em) and cream print background fabric (128 of 'em).

You begin the FGU by creating two heart-like units from the single large square and two small squares.
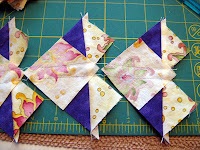
Then you add a third small square to each 'heart':
From here you mark 'em, stitch 'em and slice 'em, et voila! Trim off the little bunny ears and you're "good to go", as my daughter would say. :-)
Yesterday, after cutting out all the squares I needed, I put together 16 FGUs from four large ones and 16 small ones, with only a tiny pile of trimmed ears left over -- a far cry from the small triangles I've collected using my previous method. Plus I didn't have to invest in new rulers and I didn't have to sew bias edges. What's not to love?
Stitching continues into today, as I watch the snow fall softly and try to decide whether or not I want to shovel a third day (in a row)...
"Be well, do good work, and keep in touch."
- Garrison Keillor, The Writer's Almanac
:-)


2 comments:
Like you I think I have enough rulers. The FGU look cool and the stitching is smashing!
I really like your colors, nice and bright. I don't have the rulers that Bonnie used either, and I used the same method that you have explained. Made those flying geese easy and fast...love that method.
Post a Comment