I know; I know. It happens on the same day every year. It's just that with every passing year, the months seem to evaporate more quickly. Here it is November 25, over 3 weeks since my last post -- and I was going to try to post more often. Ah well.
It's not as if I've been idle all that time! A full ten days was spent at home because we got a Bag of Nasty Mix from Mother Nature: rain, followed by freezing rain, followed by snow. And not once, but twice! The roads were turned into snow-covered skating rinks and the County's sanders and ploughs couldn't keep up. As I write, we're experiencing milder-than-usual temperatures, and much of the snow has melted. The main streets and highways are in good shape -- bare and dry -- but the side streets here in my wee hamlet are treacherous with ice, making going for my usual walks an interesting adventure, to say the least!
So while the weather remains top of mind in conversations at church, in the Post Office and at the Shop, I've tried to focus elsewhere.
She had a good market with her photography, selling a large framed print, a good-sized photo-on-canvas, a matted print and at least a dozen of her lovely photo-cards (with envelopes).
 |
| Autumn at Cranna - SOLD! |
While she was here, Gina took several shots of the piece I want to enter into "Colour with a 'U'", and I expect she'll have them off her camera (a real one, with lenses, and a timer, used with a tri-pod -- the whole nine yards! 😉) and in the e-mail to me in the next day or two.
We had a lovely afternoon!
I've also been working to finish the last two bed quilts for the Syrian family that arrived -- as far as I know -- in Toronto on Tuesday. They were to fly to Edmonton on Wednesday to be met by a contingent from the five churches (including mine). I spent several of the 'iced-in' days finishing the sashing on the second string quilt, while my long-arm quilter, Sylvia, did a beautiful job of the one top that wasn't "Quilt As You Go". I picked it up last week and finished the binding on it yesterday.
A QAYG quilt is simple to create, and ideal if you don't have the space to quilt a throw-sized (or larger) top on your own sewing machine -- but it is a tad time-consuming, because each section must be attached together using sashing. It can be machine-done on front and back, but I don't care for the look of a machine stitch line on the front sashing, so I choose to hand-stitch the sashing on the back.
The photo below shows my 8" blocks, and a stack of sashing arranged in pairs. The front sash is cut to 8" long, and is 1" wide. The back sash is 8" long and 1 3/4" wide, but has been folded over and pressed in half.

You layer the top sashing, the edge of a block and the back sashing -- with the raw edges aligned -- and sew them by machine. Then you press the top sashing toward the edge, layer it with the next block in the row, and sew that by machine. Once that's done, you turn the pair over, and press the back sashing from the first block toward the second. You pin that down and hand stitch it. This is done until all the rows are created.
 |
| Rows of blocks in various stages of assembly on my "design bed". 😉 |
Then you use the same technique to attach the rows together, and finish off with binding in your usual fashion. I've never added borders to these quilts, but you could -- layering and quilting them first and joining them with a "zinger" (narrow sashing) in the same way. Here's the second string quilt -- intended for a 10-year-old girl, and measuring about 50" x 65".
 |
| Altogether now! |
And here's her mom's quilt, beautifully quilted by Sylvia, my long-arm quilter.
She even donated the batting for the project!
 |
| "Chain Rail Fence" - 63" x 72" |
 |
| Quilting detail |
Between the Wall-to-Bed Project and these three quilts,
I think I've had my fill of piecing for a while!
Part II: It shouldn't be this hard!!
Now it's time to begin the Christmas Knitting in earnest -- and this year it's been 'one step forward; two steps back'! First, about socks...
The Shop carries 'Reinvent', a yarn composed of 'everything but the kitchen sink' -- and I was able to purchase two skeins from the "Meow" and "Woof" collections:
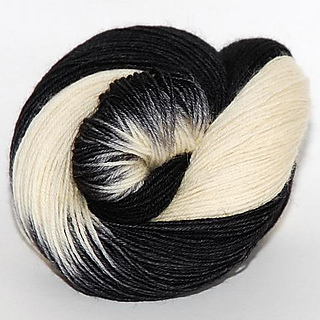 |
| "Border Collie" |
and
 |
| "Maine Coon Kali" |
My son has two Tuxedo cats, so I cast on the Border Collie using my favourite 2.75 mm needles, and 72 stitches -- my usual for his feet. AAAARGH!! The first sock came out 'way too big:
 |
| Sock for an Abominable Snowman who's part zebra... 😆 |
Clearly an adjustment was needed! I didn't change my needles but I did reduce to 64 stitches, and the result was much better:
 |
| More like a Tuxedo Cat! 😌 |
I frogged (rip it, rip it, rip it) the Abominable Zebra sock and knit it over again with 64 stitches, finishing it up on Saturday. I've washed the pair now...and they're still rather light-weight and could be a bit large. We'll see. For Gina's, in the "Maine Coon Kali" colourway (honouring her aged 'Princess'), I'm dropping to a 2.5 mm needle and 60 stitches. Fingers crossed!
In other knitting...I am making fingerless mittens for my neighbours this year, and chose "How Quiet Mitts", designed by Helen Stewart. I'm using a yummy yarn -- "Finn" from Universal Yarns -- that was a shop sample passed on to me by my employer. It's a Merino wool/Acrylic/Alpaca blend that is very soft and rather drapey, but it's proving to be lovely for this pattern. And it's in this delicious colour:
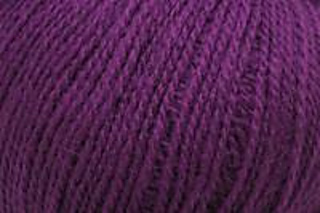 |
| Universal Yarns "Finn" Colour #107 - "Jam" |
Here's my sad story about this project:
I made one mitt and let the project sit for weeks and weeks while doing other things. When I returned to it...I'd forgotten how to do the increases for the pattern on the back of the hand...Here's what I wrote about this on my Ravelry Projects page:
I’m finishing the second mitten of this pair -- having started it four times!!! First, I cast on the wrong number of sts (32 instead of 36).Then I discovered I wasn’t doing the “m1r” correctly and had a pucker -- and it took me three (count ‘em!) tries to figure this out. Sigh.
I don’t know why the second mitten was so difficult, save to say that after I finished the first one, I tucked the project away for several weeks (I said I started it in October, but it could have been earlier) as I was busy with other things.
Now that I’ve figured it out, the “mantra” for the increases is becoming lodged in my brain and I should be able to make another pair easily. (I want to use the same pattern for my neighbour’s husband, using a grey DK.) Let’s hope!Here's the first mitten, waiting for it's ends to be sewn in. Note: it's hard to take a photo single-handed! 😣

Surely to goodness it will be all downhill sledding from here -- and all will be finished and wrapped in time for the holiday. After Christmas...yes, there will be new art in the sewdio!
I'll leave you with a link (late as usual!!) to Nina Marie's "Off the Wall Friday" -- and another to WIP Wednesday over at The Needle and Thread Network -- as well as a wish to all my American readers for a Happy Thanksgiving.
"...whatever your labors and aspirations, in the noisy confusion of life, keep peace in your soul. With all its sham, drudgery and broken dreams, it is still a beautiful world." -- Max Ehrmann, Desiderata, 1927.
1 comment:
I love the socks that you are knitting for your kids. Is it a Christmas tradition that you knit for them? xo
Post a Comment