Thursday, February 23, 2012

What the Well-dressed Chair is Wearing This Year

OR, why I'm not knitting my socks, shawl or sweater.  
Chair booties!

Modelled by one of my maple dining chairs in my kitchen

An acquaintance of mine from aquacize class has recently re-done her floors, and now has laminate flooring in her dining room   She needed something to protect the floor from her chairs but though she knits, she hasn't mastered dpns (double-pointed needles) for something this small.  She provided the yarn (left-over acrylic something) and rough instructions.  I'm providing the labour.  :-)  These are 22 stitches on 4.5 mm needles.  Knit 1:1 ribbing for 13 rounds; knit 1 row plain. Then, k2tog all the way around. Knit another plain row.  Then, k2tog all the way around.  Cut yarn and thread the end through the remaining 6 stitches, et voila!  Depending on how securely you want to have them on your chair, you can thread a bit of yarn through the ribbing near the top and tie it in a tidy bow.  She volunteered to do that once they're finished, so these ones are without ties.

Oh, and she's somewhere down south till early March, which is a good thing; I've knit 6, and there are 10 more to go (4 chairs x 4 booties each).  I do a couple a day, in between other things, so this means I'll have 'em finished in good time to take to the March 5 class.  :-)

Wednesday, February 22, 2012

Ash Wednesday


Create in me a clean heart, O God,
And renew a right spirit within me.

Create in me a clean heart, O God,
And renew a right spirit within me.

Cast me not away from your presence, O Lord,
And take not your Holy Spirit from me.

Restore unto me the joy of thy salvation,
And renew a right spirit within me.

- Based on Psalm 51:11-13

Remember you are but dust, and to dust you shall return.
May you have a holy Lent.

Finished on Tuesday...

Posted on Wednesday.  Here's my latest crazy patch block for Take A Stitch (on) Tuesday -- Week 7 in the series (already!), Unattached Chain or Lazy Daisy stitch.  We were challenged not to make just flowers with it, and a challenge it was!  


I found a tee-shirt in the thrift shop in which I volunteer monthly, and scavenged all the sequins and beads used here from that one shirt.  The neat thing is, the shirt itself is in good condition -- it had simply lost some of its beads so we didn't put it out for sale.  Now that the beads etc. have been removed, it's clean and going back to the shop!

The paisley was my Week 7 silk necktie; the red to the right on that same 'row' was a wee bit of sculptured velvet (or maybe velveteen) I had in my scraps.  The elaborate piece at the top left corner was cut from a piece of drapery/upholstery fabric scraps that a draper friend of mine gave me when I still lived in the City.  I had great fun adding to it with the Stitch of the Week.

Now on to Week 8!

Monday, February 20, 2012

Getting ARound To It

Credit: Mouth Motions
Early in January I responded to Sandy's podcast, wherein she called for "Quilty Resolutions".  She had 3 categories, including, "One UFO I'm Committed to Finish".  Now I have Bonnie to thank for the impetus to Get (my) Round Tuit and get going.

For one thing, when Bonnie quilts by hand, she has several of the same preferences and habits as I do, and that has reassured me -- it's great to know one is not alone in one's quirks!

Gummi Bears - Haribo Co., Germany


For example, I have many thimbles -- including several of the ones Bonnie's illustrated: antique (from my grandmother's sewing basket), leather, one that looks like it's made from the same stuff as Gummi Bears...but I'm uncomfortable wearing them.  I'm not fond of gardening gloves, rubber gloves for dishes and dyeing, or quilting gloves either.  I'd rather have a calloused finger on my 'under' hand, as Bonnie does.  She got an e-mail from a woman who was taught to get used to a thimble by wearing it around the house, making the beds, doing the cleaning, etc. I might try this "just to see", but I strongly suspect I'd have that thimble off within five minutes!

Last spring, though, I met a woman who uses her fingernail on the same under-hand finger.  I tried that and it works quite well -- less chance of bleeding on the backside of the quilt, and the nail doesn't seem to mind.  It recovers its regular appearance quite quickly.

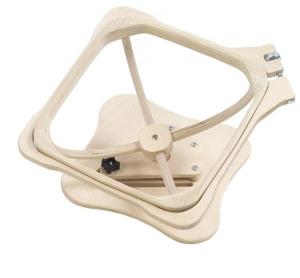
Like Bonnie, I prefer a wooden hoop.  I don't have room in my house for a full frame, and I tried a more compact one but didn't like it either.  I have to have the thing in my lap so I can get close to it and move it around to get at the areas I want to stitch.  For that reason, I also don't like a 'bottom' on my hoop -- that is, I don't like my hoop attached in any way to any sort of flat bottom (like this one), whether or not it swivels.  I prop my hoop against me if I need to, to get at any angle I wish.

Thimbleberries "Dawn"
Block of the Month ca. 2007 or 2008
And I really appreciated Bonnie's comments about consistency being more important than size.  My stitches aren't small -- yet -- and I've managed only 2 to 4 on my needle at a time, but they are consistent.

Here's that quilt I'm committed to finishing this year, when I was trying to hand-quilt it in the frame.  I've since sold the frame and moved the quilt into a hoop -- still pin-basted.  I'm not fond of thread basting -- it seems to take me an inordinate amount of time and waste a lot of thread.  The pins I can 'recycle' and use again!  I just make sure to remove any that would get caught under the hoop.

This quilt is throw-sized.  I don't think I'd attempt to hand-quilt a larger one in a hoop just yet, but I won't say "never" on that.  If I enjoy finishing this one, who knows what I might do next?


Auditions...

Yesterday I was auditioning....fabric and placement!

First, materials for a 12" square for an upcoming regional show -- SAQA Western Canada's "Best of the West", opening sometime in June.  As I played with the materials and their placement, I was thinking about the stitching and embellishment I wanted to use.


And second, with pieces for "The Picnic Quilt", made from the 2 1/2" and 4 1/2" squares I created when I recently sorted my scraps.  I still have a stack of 4 1/2" squares to use up, so it's going to be larger than what's on my design wall -- and undoubtedly what you see below will be re-arranged before the top is assembled, but I'd done enough pieces that I wanted to see what sort of combination(s) I could get if I put 'em up there.  I was concerned I had so many 'darks' and 'brights' and not that many 'lights' and 'neutrals', but once I stepped back for a good look, I was pretty happy with how the top was playing out.


I'm thinking ahead to the quilting, too.  If I decide not to tie it, but to quilt it by machine, I'm betting an over-all design would work best -- and I'm going to check out what Ann Petersen, instructor of "Quilting Big Projects on a Small Machine" over at Craftsy.com, would suggest.  :-)

And Samples...

More and more I'm requiring myself to take those thoughts and put them into samples, rather than going directly to the block itself.  I used to think that the 'direct hit' was a better use of my supply of funky donated fabrics (which cannot be replicated and therefore tend to be thought of as "precious").  However, my recent experience with that three-dimensional windmill has once again reinforced the value of sampling.  In the end, I'll use less fabric making a sample or two than I would if I went barrelling ahead, making the whole piece, only to find it didn't 'work'.

RE: the Windmill -- here are two more samples I made on Friday -- both of which I like better than the first one, and from both of which I learned something about the mathematics in block design and the materials used:

Felt 'sails' with lightweight fabric background

Playing with sheers